
Render glass in Photoshop through the 3 different techniques can all easily be applied towards any visualization. They each provide a different glass texture.
These can be applied in the post-production process or within any Photoshop collage. Rendering glass in Photoshop is a simple process that can be broken down into small steps. The 3 Glass Representation Techniques can be applied to create a glass effect with windows of all sizes in Photoshop.
Start off with your base render and your framing layers separated from each other. For example, the exterior entourage separated from the architecture. It is best to have your layers organized.
This is the window where I will render glass.
Use the CTRL+J shortcut to duplicate your base render, then select all the layers from your copied render image and merge them if they aren’t a single layer already by using the CTRL+E shortcut.
Rename your layers if it is necessary.
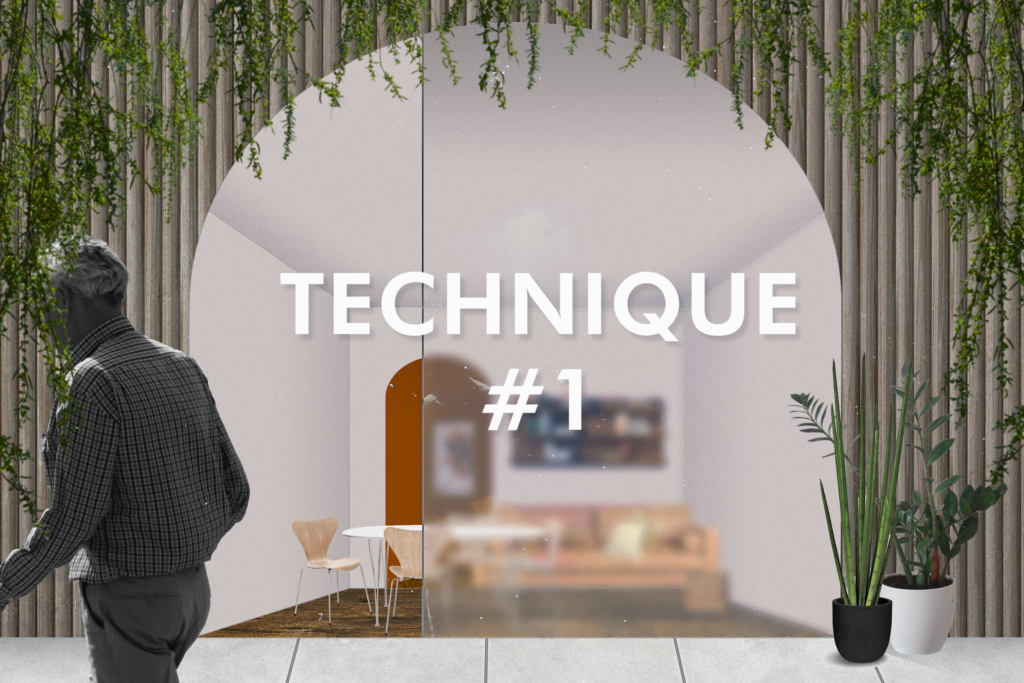
I am using the Magic Wand Tool to select the window area and then I am clicking the base render to copy the selection from that layer.
Then I am pasting it in place by using the CTRL+Shift+V shortcut into a new layer layers to keep everything organized.
Use the CTRL+J shortcut to duplicate the just pasted layer and rename any layers if needed.
Take the top copy of your duplicated layers, go to the Filter menu, and click on Gaussian Blur.
Make sure the preview option is checked and you will be able to see how the filter affects your image.
Enter 9.5 into the radius of the blur and click OK. You will now see a blurred image with a blurred edge.
Hold the ALT key over the layer that has the Gaussian Blur and click on it to create a clipping mask.
This removed the blurred edge that was seen previously.
I am adding a sky texture now to become a reflection on the window.
Paste the sky texture of your choice onto the file and place it over the window.
Then I am adding the reflection of the person walking by – copy and paste it from the original group to the newly created group
Move the duplicate to your desired location and transform it to make it smaller.
Hold the ALT key over the layer and click to make a clipping mask.
Make any additional adjustments.
Change the blending mode of the layer to Lighten with a 64% opacity.
Add a new layer and make it a clipping mask by using the ALT key and clicking on the layer, then add a gradient with a black fill going from 100% to 0% opacity with the top of the window becoming the darker side of the gradient.
Experiment with the placement of the gradient if necessary.
Change the gradient opacity to 33%
Select the window area again, make a new layer and make it a clipping mask.
Use the Brush Tool with a white fill and use it to brush the edge of the window to add a border and change the blending mode of the layer to Exclusion.
Use the Transform Tool to narrow this border if it’s too thick.
Make a new group for the layers in which this render glass technique will be used and rename it accordingly.
Copy the base window layer from the original rendering into the group and paste it in place into the new group
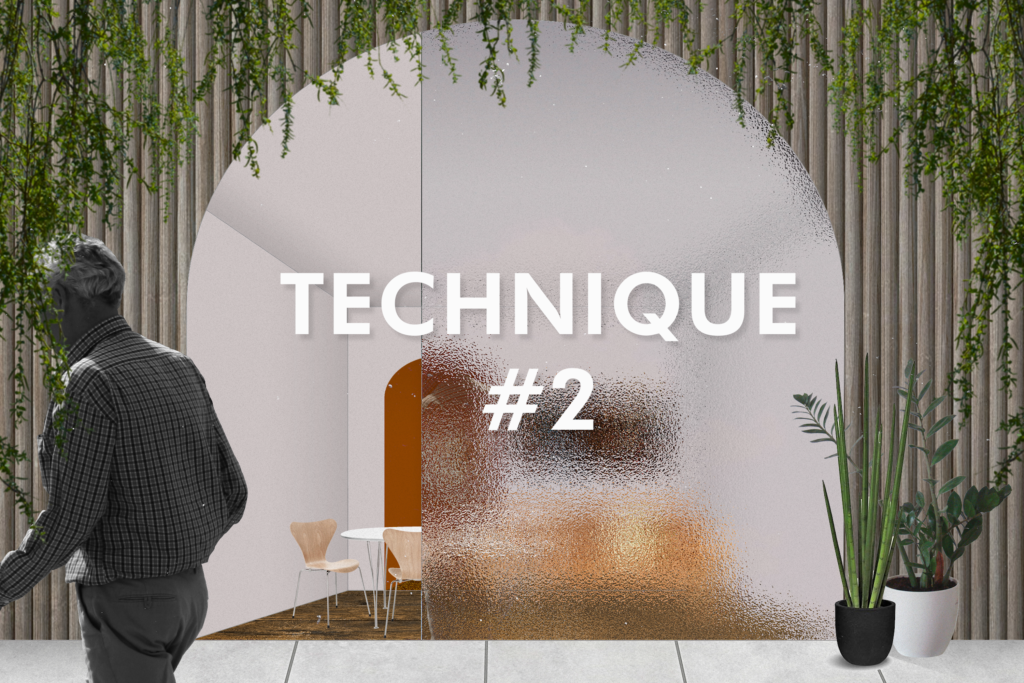
Select the window area with the Magic Wand Tool and while it is selected go to the Filter Menu and click on the Filter Gallery.
Select glass from the Distort Menu – feel free to play around with the settings while you find something you like.
The final settings I chose where: Distortion to 17, Smoothness to 2, and scaling to 79% with the frosted texture and hit OK when you are done.
Once you are done use CTRL+D to deselect everything, make a new layer, and make it a clipping mask.
Add a gradient with a black fill going from 100% to 0% opacity and add it to the top of the window.
Change the blend mode of the layer with the gradient to Overlay.
Make a new clipping mask layer and use the Brush Tool with a white fill to add a slight border to the outer edge of the window.
You can either move the line out of the clipping mask or use the Transform Tool to make it thinner and change the blending mode to Exclusion.
Add the sky reflection with any image of the sky of your choice.
Change the blending mode of the layer to Color Burn and set the opacity to 15%.
Copy and paste any other reflections you’d like to add to your image, I am adding a reflection of the person walking by.
Change the blending mode of the layer to what suits your render the best. I am changing it to Lighten.
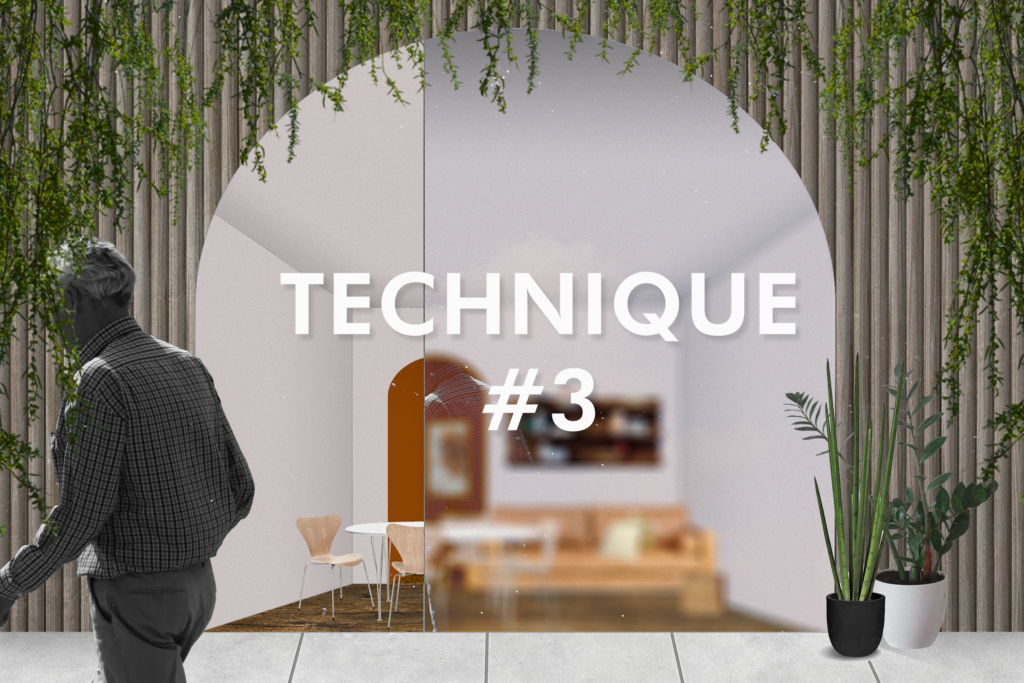
Copy and paste the base layer from the original render onto a new layer to render glass.
Rename your layers as necessary.
While making sure the layer that will have the glass effect, go to the Filter Menu and select Lens Blur.
Afterwards a pop-up menu will appear, explore with the different settings to create your desired effect.
The overall settings I chose where: Radius 35, Blade Curvature 20, Rotation 0, Brightness 0, Threshold 255, Noise 0.
Click OK when you are done.
The window now has an uneven and fuzzy edge.
Make the blurred image larger to fix this by using the Transform Tool and making any moving adjustments
Add a sky texture to create a reflection.
Use the ALT key and click on the layer to create a clipping mask, then change the blending mode to Overlay and opacity to 25%
Add any other element you would like to create a reflection like any and change the blending mode to Lighten.
Make a new layer and add a slight black gradient to the top of the window.
Make a new clipping mask layer and use the brush to add a slight border to the window edge in white and change the blending mode to Exclusion.
If you’d like make this border thinner by moving it out of the clipping mask or using the Transform Tool.